Thursday, December 16, 2021

Laser cut ornaments and gift tags

'Tis the season for some handcrafted gifts! Last year I had fun making dumpster fire ornaments. I grabbed a dumpster and fire SVG from Wikicommons, offset the path to create a cut outline and manufactured some a terrible momento of the year that was.


This year I thought I could be a bit more positive and help make egg nog a bit more palatable. I saw some ornaments online that cleverly held a mini liquor bottle and played on the "another shot" theme of vaccines and whatnot. I wanted to use a mini rum bottle because of eggnog so needed to draw the ornament around the shape:

Adobe Capture works really well in auto-tracing outlines from photos. It also kept the scale which made it easier to size the whole ornament. My first design had a huge bow on the top where I thought I could etch in names but it was much too large once the bottle was added. I was really close in making the cutout for the "Take another shot" text shape fit inside the bottle cutout with the syringe but it just didn't work out.

As with any large project I had lots of leftover scrap wood, most only a few square inches. A great project to use up scrap wood is making personalized gift tags:

Find or draw an outline of gift tag. If you're using an image you convert to paths by going Object > Image Trace > Make and Expand. You may need to force a certain Image Trace setting, for example "Black and White" or "logo." Delete any extra paths that get generated, and any other elements that you don't need such as the hole. Since I'm adding letters and cutting out the negative space the hole is useless.

Drop in a text block with your name. Choose a font that has appropriate vertical height and adjustable kerning. I used League Gothic and was happy with the default kerning so I just scaled the vertical to have a bit of overlap with the inner tag path. Each letter must enough overlap at the top and bottom so it remains attached.


Use the direct selection tool to select the gift tag anchors on the right side. Stretch out those points to enclose the whole name. Make sure to hold down Shift to lock the horizontal plane as you stretch.

We now need to merge the text with the ring but only keep the outside edges. In other words, we don't want to cut out the entire letter, just the parts that are not touching the gift tag. Select the text box, Type > Create Outlines. Remove the fill and change the stroke to match your laser cutter settings (I used black 0.25pt). With the textbox still selected direct selection only the inner path of the gift tag and use Pathfinder > Shape Mode > Minus Front. Tada!


Wednesday, November 24, 2021

3D printer control using OctoPrint

A big portion of our Makerspace is devoted to our fabrication lab (fablab!). 3D printers do the additive manufacturing and the laser cutter handles the subtractive. We currently have five 3D printers running pretty well: four cheaper, smaller Monoprice Select Mini V2s using PLA and a larger Creality Ender 3 that uses PETG. The Minis are maybe five years old now and have more than made up for their initial $200 cost. Even the Ender 3 was good value at ~$350 CAD a few years ago.

I'm still a big believer in running smaller, cheaper 3D printers. This is especially true in an elementary school environment where volume (ie class sizes) dictate production flow. The advantage of one larger, better printer (our Ender 3) is it can handle larger print volume (230mm x 230mm x 250mm) at much higher detail. The technology has advanced enough that cheap printers can be optimized or calibrated easily and can produce dependable prints before maintenance or parts are needed.

Student designs are typically handled through three different platforms. For early primary, we use hand-drawn designs that are converted to vector drawings using Adobe Capture. Simple 3D extrusions can be handled in Illustrator or Inkscape. Older primary use Blox 3D or Reality Composer on iPads. Intermediate students exclusively use Tinkercad, either manipulating 3D shapes or using Codeblocks.

A recent Grade 6 project involved making loaded dice for a Math UnFair project. Students used Tinkercad Codeblocks to create dice with an unfair proportion of outcomes. At a good-quality layer height of 0.175mm using PLA I was able to print a class of 25 dice in about four hours. This rapid production scheme allows for more iterative designs from students and greatly improves the speed of the design cycle.

The Minis apparently have wifi capability but I never bother to use it. Instead, I slice models in Cura and copy the resulting gcode to memory cards that are physically inserted in the printers and started. The Ender 3, however, has OctoPrint installed in addition to its memory card reader.

OctoPrint is a lovely web server built on Raspian and optimized for Raspberry Pis. It's intended as a web frontend for 3D printers physically plugged in. In our case, it runs locally without external connection and is connected to our Ender 3. OctoPrint allows for remote uploading and starting (even slicing!) of files, but I mostly use it to monitor longer print jobs.

Our Ender 3 is optimized for silky-smooth high-quality prints using PETG and mesh bed levelling. As a result, print jobs tend to be quite long. Benchy, for example, takes about 90 minutes! This timelapse was made using Octolapse, a fun plugin for OctoPrint that extrapolates timings for webcam snapshots to make models appear to grow out of the bed. You can configure it to take snapshots at specific times, such as when the extruder is out of the way or simple stop-motion effects.
The built-in timelapse feature of OctoPrint works well too

I used to run OctoPrint on an old Pi 2 Model B but it had quite a bit of lag on it, even when it wasn't communicating with the printer for a printjob. I swapped it out for a Pi 4 and it runs much, much better but that seems to be a bit of overkill. It tends to run quite hot so make sure you check temps using "vcgencmd measure_temp" every so often. There's probably a plugin for that, but it's easy enough creating a bash alias and having it displayed. (Edit: I just installed the Resource Monitor plugin that appears to poll the same info).

A few last tips: 
  • OctoPrint runs headless by default so make sure to have a spare monitor handy to check the IP on boot. 
  • If you're using the official Raspberry Pi imager you can also press Ctrl - Shift - X in the imaging menu to enable SSH, set locale and write wifi SSID login before flashing to a memory card. Very handy if you want to just connect to "http://octopi.local" on boot. 
  • When uploading files do NOT use the "upload to SD" card option; it runs painfully serial slow. You're better off uploading directly to the Pi memory card and running from there.
  • While OctoPrint works great on a Pi it would work similarly well on an old Chromebook. It may even be better since you don't really need the mobility/portability of a Pi, the GPIO pins or power constraints.

Thursday, November 4, 2021

RGB LED Matrix Panel

A while ago I had purchased a cheap LED matrix panel from Adafruit. I had intentions of using it as a scrolling menuboard for our Makerspace vending machine project. I re-discovered it and finally spent some time figuring it out.


The panels are relatively simplistic. Mine had 32 LEDs across and 16 down, totalling 512. They run off 5 volts with a maximum draw of 2.5 amps if all LEDs are on. The data interface is HUB75 with 12 total pinouts: 6 data and 6 control.

My first mistake was using the "official" tutorial Adafruit supplied. I spent some time wiring it with jumper wires to a Raspberry Pi, but of course just like Hal with his light bulb I ended up in a spiralling chicken-and-egg situation of missing power supplies, Linux distros, and diagnosing SSH connections when I forgot to enable it in the first place. I even had to build a HDMI monitor because I forgot how to run headless Pis. Ugh.
All I wanted to do was make a colourful sign...

Once I sorted everything it still didn't work! Unknown to me at the time, the Adafruit wiring diagram was outdated because the RGB libraries had been updated which switched around the wiring!

Long story short, I switched to an Arduino Uno. If you're looking to do a similar project here's what I noticed:
  • Adafruit's RGB Matrix library works well. Make sure you install it in your Arduino library.
  • Arduino Unos work but their limited memory makes flicker-free scrolling text a bit trickier. Either use a Mega or strip down the code to make it fit.
  • Maximum current is 2.5amps but for our static "Makerspace" message the draw was a constant 400mA so I powered the matrix off the Arduino 5V pin. I wouldn't recommend this if you have more LEDs lighting up since the maximum draw off the 5V pin is between 400mA-900mA.
  • The code uses the function matrix.Color333(r, g, b) to specify a colour of the LED. The range is from 0-7, so red is 7,0,0 and white is 7,7,7.
  • Ardunio Cloud's limit of 200 seconds/day in compile time is not nearly enough. Stick with the physical editor.


Tuesday, October 19, 2021

Extending a Chromebook past the Auto Update Expiration with BrunchOS

 I first ventured into the world of Chromebooks in 2014 with a class set of Acer C720s. We were coming from a fleet of repurposed ex-staff HP laptop bricks with terrible battery life and wifi, so getting a 2.5 pound 8-hour battery cloud terminal was magical! I think they cost $280 CAD each so that allowed us to get outstanding value, even with the addition of the exploitative $30 management console fee.

In 2018 we retired the fleet. They had worked outstandingly well, save for a few keypad issues. We had expanded the Chromebook program to our entire grade 5 population so replaced them with Lenovos. There are many build quality issues with the Lenovos around the camera, keyboards and screens that have frustrated me but those stories are for another day!

Even though the C720s were running great we would have had to retire them the next year anyway due to Google's Auto Update Expiration (AUE) that only guarantees ChromeOS updates to a certain date. Running Chromebooks past this date is like running iPads past their iPadOS end-of-life; they'll work but they receive no security patches or bug updates. This is problematic in a school environment and generates lots of e-waste.

For Chromebooks the easiest solution is using Neverware's Cloudready images. The process is fairly straightforward: download the Cloudready image, burn it onto a USB device using the Chrome Recovery Utility, and restore it on the Chromebook. Unfortunately, the C720 is not on their official supported devices list but I'm sure it would work fine. The pricing structure can work for larger 1:1 districts, but at minimum yearly $2500 USD I don't see value in maintaining an older set of Chromebooks for extended periods.


Replacing an aging fleet over a 3-year cycle is more cost-effective

Another solution is turning Chromebooks into simple Linux boxes. Crostini is Google's official Linux release but it's only officially supported on certain devices, not including the C720. The easiest chroot solution is Crouton but I've never tried it since I'd prefer to run Linux outside of ChromeOS. GalliumOS xubuntu seems to be the most popular option for single-booting.

Since I wanted to renew our C720s for student use I instead looked for a way to install a newer, updatable version of ChromeOS. This attempt had started a few years ago with the release of Croissant (love the food names, perhaps in the spirit of Android dessert release names?). Recently I discovered Brunch, a framework that uses a generic recovery image to install ChromeOS.

To start, you need to update the C720's firmware. Before you can flash a new firmware, remove the write protect screw. Then enable Developer Mode and reboot. Open a crosh shell and run the script provided by MrChromebox:
cd; curl -LO mrchromebox.tech/firmware-util.sh
sudo install -Dt /usr/local/bin -m 755 firmware-util.sh
sudo firmware-util.sh

With the updated firmware you can boot from the USB where you've placed Brunch. Note that on the C720 you must use the Rammus recovery image only

Wednesday, October 13, 2021

Assigning Apple Volume Purchasing licenses to Bring Your Own Devices

My school has enjoyed the myriad of benefits from Bring Your Own Device for a number of years now. Students in Grades 2-4 are expected to include an iPad as part of their school supplies. Over the years, we've experienced the longitudinal wave of app acquisition: from excitement and experimentation with dozens of free apps in the early years to paid apps and, recently, back to free apps.

In the beginning with a handful of iPad 2s (2011; over a decade ago!) our teachers were excited to try out such exciting digital opportunities as Calculator, Screen Ruler, or many other free apps that barely made it out of the substitution tier in Puentedura's SAMR model. Free was great for classrooms on a budget and we didn't need to worry about licensing since free apps could be transferred to different iPads using master backup images in iTunes. Shortcuts included using encrypted backups to save passwords and wallpapers, and 10-port USB hubs for simultaneous re-imaging

App development reached a crescendo with the refinement of the iTunes App Store. License agreements were refined and the Volume Purchase Program (VPP) was created to help with the influx of educators wanting paid versions to avoid advertisements or to unlock premium features. VPP in particular was a boon for me as it offered 50% discounts for 20+ quantity purchases and offered an easy distribution method for our BYOD model: redemption codes.

Redemption codes allowed me to transfer licenses of paid apps directly to our students. Ownership and updating remained with families and was completely hands-off from the school. We didn't need any device information, AppleIDs or any other identifying information. Redeeming a code downloaded the exact version of the app we wanted and eliminated any confusion that could happen with providing gift cards or having families deal with inputting payment information. We were also able to track which student received which code and stay on top of compliance.

A little too app happy?


In recent years, we've started to move away from paid apps back to free apps. But instead of ad-sponsored or freemium apps we're back to relying on a small number of legacy or enterprise apps: Keynote, iMovie, Google Docs and Slides and a number of free-to-download apps that use subscription models. One notable exception is Book Creator and their move towards a teacher-centered subscription model with unlimited students. Book Creator has removed the academic discount of 50% for their app (currently $3.99 CAD) and heavily promotes their web-based subscription model.

Last year we migrated to Apple School Manager (ASM) to ensure continuity of purchasing and managing our volume licenses. ASM works well with Meraki MDM which I use to manage our iPadOS devices. Last year also marked Apple's deprecation of redemption codes. This was a gut punch to our model of hands-off BYOD and required some thought to maintain our level of support.

We could use Apple Business Manager instead which still allows generation of redemption codes. Unfortunately ABM does not offer academic discount of 50% on 20+ quantities. This would add up to hundreds of dollars for us yearly. Instead, I am using ASM to purchase paid apps along with any applicable discount. These licenses sync with Meraki which allow for easy distribution to school devices. Family BYOD never engage with Meraki though, and I did not want to go down the path of registering of external devices with our MDM for privacy, security and logistical issues.

What is working well so far is using Apple Configurator to assign licenses to family devices based on device IDs and serial numbers. No personal or other identifying information is shared. Configurator also allows me to transfer the apps instantly without the need for families to log into an AppleID or initiate a download. Unfortunately, this requires a physical connection from the iPad to Configurator. This involved me visiting groups of students and plugging their devices in. Students needed to enter their passcode, after which I made sure to download the unlock token.

VPP apps in Configurator

It took me while to sort out the ASM and VPP accounts and syncing them with Configurator. Sometimes I would log in and could view non-migrated licenses, and other times I was able to view VPP licenses. This article was helpful but I ended up not needing to create another location in ASM. I highly recommend saving a copy of the .ipa file for each app you want to transfer. Configurator, for some reason, removes the .ipa after each transfer which means it downloads a fresh copy every time you plug a new iPad in. This adds minutes to each transfer. For me, the .ipa gets saved in:

~/Library/Group Containers/K36BKF7T3D.group.com.apple.configurator/Library/Caches/Assets/TemporaryItems/MobileApps/

You must copy the file before Configurator completes the transfer because as I mentioned, it'll get removed immediately after the transfer completes.

To transfer the app and assign the license plug in the iPad and select +Add App. Choose the apps and cancel the operation after Configurator assign the licenses. Now select +Add App again and choose the .ipa files from your computer. If the app does not open on the iPad when tapped it probably means the licenses weren't assigned correctly in Configurator and you'll need to repeat the process.

There are some unknowns about this process. I don't know what happens when an app needs updating, or if the apps gets removed by accident. I assume we'll need to plug everything back in to Configurator. I also wonder what happens if we revoke licenses; does the app stop functioning or is it similar to download an app then logging out of the AppleID? The biggest question would actually be: what's changing next?!

Wednesday, September 8, 2021

Paper CUPS and cheating at GAM

 It's the start of another school year and the beginning of a furious period where I try to remember how I did things a year ago. And then discovering there were shortcuts I forgot about!

We use Papercut Mobility to help setup devices to print to location and usage-specific printers around the school. One of the great things about Papercut is the usage of a universal print driver which usually works great, skipping the need for installing many different packages from different vendors.

Behind the scenes, I'm pretty sure Papercut is just delivering the print job as a PDF over Postscript. While helpful in setup this means many of the printer features such as finishing, paper sizes or trays aren't available to users. An easy way to "upgrade" the Papercut driver is by installing the vendor specific driver.

A nice visual way of doing this is by turning on the CUPS interface. Run in a terminal:

cupsctl WebInterface=yes

then visit http://localhost:631. In the CUPS interface modify the printer you normally print to and add the printer package file. Note: I have not tried this with the "Find me" printer and can imagine this would cause issues.

Another year also means many missed updates from critical software packages such as Google Apps Manager. This is a lovely tool that assist in API calls and can even accept batch commands. After updating our instances to the most recent version of GAMADV-XTD3 I printed out a copy of the GAM Cheat Sheet to post on my already crowded wall. I look forward to forgetting it's there.

Wednesday, March 10, 2021

Phenakistoscopes, zoetropes, and a stepper

I've been a fan of Tim Minchin ever since I first heard White Wine in the Sun. Last year, he released a music video for Leaving LA, a scathing take on his experiences in Los Angeles. It's a great song but the music video was amazing. Animator Tee Ken Ng filmed live-action video, printed each frame, and cut out figures to place on a zoetrope. You can see the laborious process in the behind-the-scenes video:


I really liked seeing the focus on hand-cut figures and printing each frame, rather than rotoscoping in Aftereffects or automating the process as Tee Ken mentions. But I started thinking of how this process could be automated, or at least simplified, for middle school students.

I broke it down into two steps. The first is film the live action on video. For beginners, it would make sense to lock off the camera on a tripod and enforce the flatness of plane, so keeping figures relatively similar in scale. This would prevent scaling issues in the cutouts if figures moved towards camera and parts were cut out of the frame.

Next, extract each frame as a separate image file. Adobe Premiere and Illustrator can do this simply by exporting the video as a PNG sequence. However, we do not give student licenses to Adobe CC so an even easier process is to use an online animated GIF maker. ezgif.com allows you to upload a video file, choose the frames per second, and "split" it into individual GIF frames. It even packages it as a simple ZIP file:


Tee Ken printed each frame and hand-cut the outlines using a blade. However, I imagine with the right background and defined outlines you could automate this cutting process on a Cricut or a laser cutter. I haven't tested this yet, but filming against a chromakey would allow for transparent backgrounds that simplify the outline trace process. Since you just need the outside line for cutting a batch process or action could colour the line and produce vectors ready to be stacked and organized on a cutting bed. See biologic shape analysis for intriguing uses of AI in Python to further automate shape outlines.

Cutting is step three, so step four would be to mount each cutout on a zoetrope or rotating platform. What makes the persistence of vision effect work is the rotating platform or disc is spinning at a constant, exact speed. That speed is synced to the frame rate of the camera and shutter speed adjusted accordingly to reduce flicker or strobing. In a perfect environment you could build a motor that ran at an exact speed (like a record player or CD drive motor) and instruct students to only use one type of template, e.g. 48 images per second on one disc. In reality, a bit of variety is nice so an adjustable motor would be ideal.

I still had a NEMA 17 stepper motor (1.7 inch x 1.7 inch faceplate) from an old Printrbot 3D printer and made a quick setup controllable with an Arduino Uno, 10k potentiometer and an Easydriver. I took a chance and powered the stepper off the Vin of the Arduino, so far it's worked okay. The Fritzing breadboard diagram is from Schmalz Haus:


I'm pretty excited about the possibilities of this and even having students create their own motor assemblies. The easiest would be through a micro:bit and a DC or stepper controller running at a constant speed. Lots of possibilities for even building the whole contraption out of cardboard. To be honest, I'm probably not going to be continuing this for a few days. Staring at the rotations too long makes me quite dizzy and gives me a headache:


Friday, February 26, 2021

Preparing scanned drawings for the laser cutter

This is a workflow for taking a drawing (or anything printed) on paper, creating a vector outline around the drawing, removing any interior objects, and setting the colours for proper cutting, scoring and engraving on a laser cutter.

Recently Junior Kindergarten students wanted to design and test their own boomerangs as part of a unit on Australia. I thought it would be fun if they drew their own boomerang shape they were cut out on 1/8" plywood. Typically, my workflow would use Adobe Capture. It's a fantastic app that identifies drawings and converts to vector SVGs that you either save to your Adobe cloud library, or export via file ready to Airdrop or save to iCloud, Drive or whatever. 


As wonderful as Adobe Capture is, it only has basic editing features like an erase or adding lines or crop. It would take too long to manually reduce the wide sharpie lines to one cutting lines. Student names also appeared inside the boomerangs so I would need to import SVGs into Illustrator to re-code those lines as engravements or scoring lines so I might as well stick to Illustrator as my main workhorse.

The first step was to scan the drawings. Luckily our photocopiers have sheet feeders and can email multipage files. Unluckily, they can send PDFs and cannot send multipage image files like PNG or TIFF files. I made sure to increase the contrast so the black sharpie really stood out agains the white paper. Once I received the PDF I had to export each page as a separate image file. Mac's Preview cannot do this; it instead exports images as multipage PNG files which doesn't work well with Illustrator.

Adobe Acrobat CC does this well and quickly but I don't have it installed as a result of a hard drive purge I did recently. So, I built an Automator workflow. Note the RGB colour model. Ensuring all ingestion is done with RGB models will make our laser cutter colour palettes match in Illustrator later.

In Illustrator, I set the artboard size to 12"x20" which is the size of our laser cutter size. This is useful to get a good sense of scale and to help arrange all images once we're done vector-izing. DO NOT open the PNG or PDF files using the File > Open command: this will probably incorrectly set your colour models and artboard sizes. Instead, use the File > Place command. I did three images at a time so I had room to work.

In hindsight, it probably would have been quicker to trace over the line drawings using the pen tool but that would add my own (terrible) drawing skills into the mix and remove the authenticity of their own lines. Plus, they wrote their names in the middle and I didn't want to trace over those lines!

Instead, I used Image Trace. Click one object adjust the options as needed. I used the Black and White Logo preset. Illustrator will suggest rasterizing the images before image tracing but I didn't really notice a difference. It will also warn it will take a long time but it's lying.

Once done, click Object > Image Trace > Expand. You can now use the Direct Select tool (white arrow) to select individual lines or use the Selection Tool (black arrow) to move your object. Since I own the originals and probably will not make any modifications down the line I didn't bother with making any copies or working with duplicate layers; I made all the following changes to the master.

Notice how there are two paths for each Sharpie line. Because the line is so thick, Illustrator has traced the outside line and the inside line. If we sent this to the laser cutter as-is we get a hollow outline of the boomerang since it would cut both lines. To make it very easy to identify and see I tried to clean up the image so anyone getting the vector file later on can see there is only one cut line.

Select the outer line and click Object > Path > Outline Stroke. Then, in the Pathfinder window, click Unite. Now Object > Path > Offset Path. Find an offset adjustment that works for your object.

You should be able to direct select any paths that do not belong and delete them, leaving only the outside outline that we have offset. Take note of the Fill and Stroke colours and which objects you are selecting! When done deleting you can colour the outline stroke to whatever your laser cutter requires. In my case, I used red:


The boomerang above is ready to be laser cut. I opted to leave the name filled with black so I could have it engraved. I later changed my mind and outlined those names as well so I could score them; this reduced cut times quite significantly! It also had the unintentional effect of giving me more space on my bed/artboard to place objects since my laser cutter needs about 1" on each side so the laser head can slow down when engraving. It doesn't need this headroom when scoring or cutting.

Some boomerangs needed some additional cleaning up. Some Sharpie lines were quite jagged and if printed would create pretty sharp edges. Not great when 4-year olds are throwing these, no matter how carefully you setup the test range! For these, I selected the outline and smoothed out the anchor points with Object > Path > Simplify. Be careful not to reduce to too few points: you may actually increase the pointy bits inadvertently!

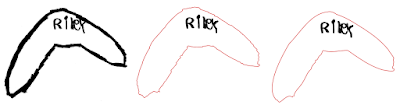
Scan to Image Trace to simplifying the outer path. You can see the smoothness and reduction of points.

You can now organize, place, export these objects however you'd like. I opted to place as many boomerangs as I could on the artboard/bed since I could rotate and slot them in like Jenga pieces. I actually spend too much time on this, and this time wastage doesn't really translate well when I realize I've saved a few square inches of plywood that is only a few cents worth.


Tuesday, January 26, 2021

Lego Robotics: SPIKE Prime and Mindstorms

It's a confusing time for educators who use Lego robotics. The end of 2020 saw the release of a new Lego robotics ecosystem: SPIKE Prime. Or is it called Mindstorms? Or 51515? Or Robot Inventor?


I guess it's "all of the above" but it depends on which application you'll be using it in. SPIKE Prime seems to be geared towards the school or organization setting whereas the Mindstorms and Robot Inventor line looks more retail or consumer based, especially with the model number: 51515. They contain similar Technic-based components and share the same hub (or "brick") unit but differ in number of components and motors and sensors.

However, don't be fooled by the incremental set number, this new line is not intended as a replacement or upgrade from the 31313 EV3 line. It sits in between WeDo 2.0 and EV3, according to Lego:


I have never used WeDo but my school has invested heavily in EV3 so I was curious about the new line and how it may affect our scope and sequence of robotics. I can't imagine replacing our EV3 investment right now, we just have too many parts and components and resources to justify that so any replacement would be years away. However, could SPIKE/Robot Inventor serve as an addition to our primary or middle years program?

I've had a few days to play with the 51515 Mindstorms Robot Inventor set and can give my first impressions. It's easiest to compare the new line to EV3 since they share similar ethos and it's the line I'm most familiar with. Some of the major differences to EV3 for the brick or hub include:
  • No LCD display; replaced by a 5x5 array of monochrome LEDs
  • Smaller and lighter
  • Includes a built-in accelerometer and gyroscope
  • Smaller storage memory but I haven't done enough programs to test the limits
  • Hubs cannot connect together
  • Included rechargeable battery pack!
  • Speaker is awful and can't play MP3s or WAV files

I never minded the LCD display on the EV3 and the new LED pixel display take some getting used to. Programs are loaded, for example, by a pixely number displayed requiring you memorize files. This would be disastrous in a classroom setting, however it's Lego's intentions to depend entirely on the Mindstorms app where you can have a bit of organization. I'm not aware of any classroom management component of the app so I hope there's a way for educators to manage the logistics of multiple classes and projects.

Speaking of the app, it's crashed or hung multiple times for me which isn't very encouraging. I also had problems updating the firmware on the hub and motors on first boot. I had to pull the battery and restart the process three times, each time thinking I had bricked the brick. I also had some connection issues until I changed the charging cable to the included one and things worked much better. Side note: it's still a micro-USB connection which is odd, I would think a USB-C connection would be more future-proof.

I haven't checked out any SPIKE Prime teaching resources but the Mindstorms app is very consumer-geared. There are no paper assembly instructions or ideas including the box. Instead, videos and multi-stage projects launch you right into the building via the app. I liked the variety of first projects, they definitely show you how the different Technic components work to structurally support and utilise the motors. I have only used the iPadOS version but the block coding components seem sound and apparently there is tight Scratch integration. I haven't tried microPython yet.

Cables, sensors and motors are new and not compatible with EV3. They may be compatible with a certain Technics line but I'm not certain. This alone would prevent us from a complete replacement, we have hundreds of these components that would require repurchase. The motors do have an absolute position mark and the app handily reminds you to calibrate the motors/servos each time which is nice. I am very nervous about the fixed wires, however. Instead of the pluggable cables of EV3 each motor and sensor has a permanent cable affixed. If the cable breaks then the entire motor or sensor needs replacing instead of just the wire.

All-in-all it's a pretty smooth lineup of new components. It really does seem very closely related to EV3, however, which makes it an odd introduction or middle-ground. There's not much here, outside of the app, to make it that much more easy for young builders; I feel like you can just jump straight to EV3. I've seen some great simple resources produced for EV3 that make building and programming easy for younger students so that would be more cost-efficient.