In everyone's learning journey there are always moments of pause. Press space to continue.
Friday, December 4, 2020
Document camera reflectors
Thursday, October 22, 2020
3D printed hub rings
Last year I purchased steel tire wheels for winter tires but they didn't fit my car exactly. Wheels have a center hole that fits over the hub of the car. Typically, this hole fits perfectly and allows you to quickly fit the wheel over the studs. This kind of wheel is called hubcentric and makes for a foolproof install.
Lugcentric wheels have the same holes for the wheel studs but the center hole is larger. Manufacturers can make a smaller number of varieties since one wheel design can fit a larger variety of cars. However, since the center hole is larger, it is trickier to line up the wheel studs in the direct center of the lug holes. A wheel that is not perfectly centered can cause vibration leading to steering instability and, potentially, loosening of the lug bolts.
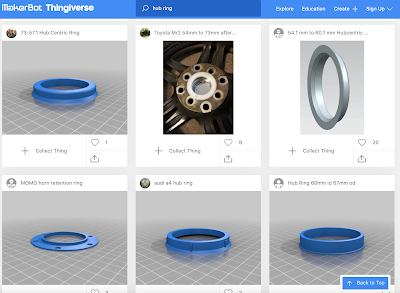
Hub rings are spacers that you can use to fit over the hub that line up the center wheel hole so the lug studs fit in the exact center. They are typically made of plastic since they do not offer any structural integrity; they are merely used as placement spacers. This makes them ideal for 3D printing from home. Thingiverse offers many user designs:
Wednesday, October 7, 2020
Learning by cheating and breaking things
I've been hit with a wave of nostalgia recently. Does this theme song bring you back any memories?
3-2-1 Contact was one of many astonishingly brilliant educational shows that had a huge impact on my childhood. It came out right when I was an impressionable kid that was interested in a bunch of different things. It normalized the excitement of science and technology and made for fun viewing because it included dramatic elements like The Bloodhound Gang.
In addition to television, 3-2-1 Contact had a printed magazine that included a section at the end for BASIC programming. I would borrow the magazine from my school library and either type in every single line with the one Commodore 64 or take it home and try it on my 286 (complete with TURBO button!).
It would take multiple compiles and dozens of syntax errors before I could get it working right. And that's when I learned I could cheat by understanding what I was rote copying. If I could manipulate a number here, a command there, I could change my score or entire elements of the game.
Today I put that concept into practice and built an escape/puzzle room in CoSpaces for my Grade 5-7s. I used simple CoBlocks to make responsive doors and moving platforms and bridges that blocked the user's path. I challenged them to complete the room, and if needed, to re-code it and break anything they wanted. I was hoping that by remixing and cheating they would learn how they could manipulate the set of coblocks I used. It worked well and everyone had a great introduction to VR.
I remembered these experiences after reading Greg Baugues' same experiences with his daughter and marvelled at the similar nature of our circumstances. I wonder if watched The Edison Twins too?
Monday, September 14, 2020
iOS Device Enrolment in Meraki
Apple's Device Enrolment Program is a slick and foolproof way to enrol and configure devices. It covers iPad and iPhone devices, Mac computers, and Apple TV. Each of these devices requires activation by phoning home to Apple on every reset. Bypassing this activation removes the devices from security and OS updates and access to other official Apple ecosystem products, such as the App Store.
DEP devices enrolled in an MDM, like Meraki at our school, makes a simple hands-off reset procedure. The reset procedure is initiated online without the need for the device in hand. Once the device is online it resets and upon a successful activation will automatically download the Meraki profile associated with the device. This allows customization of apps, wallpaper, restrictions, wifi and email settings, etc.
For legacy devices that were not purchased with DEP enabled or older devices that are not compatible with DEP your best option to register the device via Apple School Manager or via Apple directly into DEP. Failing that, you can still use Configurator to manually supervise and push a Meraki profile on the devices -- but this requires the device on hand. We have a few dozen of these iPads and it requires a lot of plugging and unplugging but it's fairly straightforward.
The only profile you're really pushing via Configurator is the Meraki MDM enrolment URL so the iPad can download it in the setup screens, and a wifi profile so you are not manually typing in SSID passwords. There are a few other quirks: sometimes there are conflicts with wallpapers and lock screen messages, but most are cosmetically minor.
Tuesday, June 23, 2020
eLearning stats
50 teaching days.We had four days of pro-d from March 26 to March 31 but I tried not to include those. For the 50 teaching days I just used an online calculator to take away the weekends and holidays. The last 10 of those days were actually a combination of our Home Learning and On-Campus Blended Learning.
1,484,152 minutes in Zoom (JS).
495 hours in Zoom per day (JS).
56,036 Seesaw posts from students and teachers (JK-4).
27,6681 Seesaw comments (JK-4).
4652 Google Classroom posts (5-7).
The Zoom stats are very misleading. The raw stats outputted from the Zoom dashboard seem to multiply the number of meeting minutes. We don't require (or suggest) students to create Zoom accounts but faculty must have a registered account so it's easy to just pull out faculty stats and filter for just the Junior School (JK-Grade 7). However, Zoom seems to include participants into meeting minute totals but it's quite inconsistent. So a teacher hosting a meeting for 10 minutes with two participants may end up with a meeting total of 30 minutes!
I'm a little surprised that Chromebooks are not represented higher in the OS breakdown. This might be because this chart comes from client information so only tracks participants using the packaged Zoom app. I still strongly recommend Chromebooks in our BYOD years and we have maybe 25% representation in the school so I would have expected a greater percentage here.
The Seesaw stats were pulled from the admin dashboard and needed a bit of calculation. Total posts were found by subtracting our June 12 total from the April 1 total. Seesaw also provides a "weekly item" analytic but it's confusing. It would imply that each week thousands of posts were being added which would greatly skew our "total posts" analytic. I suspect this "weekly item" total also includes comments and attachments:
Monday, June 22, 2020
Running apps and tech
I've been using the Nike Run Club app for about a year. I typically run pretty minimalist since I don't like wearing a running belt or pack, so just have the pockets in my shorts. I use an old tiny Android phone that's quite light and small so I can slip it into a pocket. Nike runs just fine on it, though it can take a few minutes to get a GPS lock -- I feel this is an app issue rather than a phone issue because Runkeeper locks very quickly.
I manually download MP3s on it, a mix of songs and podcasts. Up until recently I was able to use the FM radio since I use wired headphones. I now use a cheap Bluetooth pair which work great, but lose the FM antenna. The advantage of FM radio was battery savings: using the FM radio barely registered any battery usage compared to the stock Music app. To create playlists, I use Playlist Creator since it allows import of folders and individual MP3 files no matter where they are stored. These playlists then get picked up the stock Music app.
Nike Run Club is great for it's content. It has podcasts that are synced to your run, either in distance or time so it's nice to hear encouragement and training tips offered at the right times. I always need reminding to start slow and finish strong! There are great guest speakers from Olympic athletes to celebrities to amateurs. The variety is nice to stave off boredom. The guided runs also have lots of choice in their distance or time or focus. There are short runs, long ones, "easy win" runs and stress reliever runs.
The biggest reason I went with Nike was the training programs. I has customizable plans for the typical runs, like 10K, half and full marathons. You input your weight, age, time commitment and how many weeks until your event and it spits out a unique plan. Or so I thought, it seems the plans are minor tweaks to the publicly available Nike plans. Similar to other runners, I didn't notice that much of a difference or changes to the plan according to my results or the "baseline" run. I will say that the plan was very doable, so maybe the tweaks were there and enabled my completion!
There are a few disadvantages to the Nike app. First is the GPS issues; I've constantly had issues with GPS lock and wildly incorrect waypoint logging. Distances also tend to be inaccurate which leads to either incredible records or dismal failure. I had the crash maybe three or four times when saving a run which forces you to manually enter the stats (if you can remember them).
Perhaps the biggest issue of the Nike app is it's walled garden. It's painfully difficult to export or import stats. You need to rely on third-party hacks since Nike has shut down it's API. I use Rungap to export activities and highly recommend it. It's very smooth and simple and offers quite a lot in its free tier, even backing up to Dropbox. It converts the Nike info into a proprietary JSON format but since it's all text readable there are a handful of converters available. I opted to just purchase an upgrade for a few dollars and let Rungap convert all my activities to GPX format, the universal standard for activity tracking. It can also concert to FIT and TCX if you need those filetypes.
Another big reason to upgrade Rungap was to simply import these activities into another fitness tracker. I've decided to switch to Runkeeper, an app I used before Nike, just to see if the GPS tracking was better. Rungap handled importing all my activities (about 130 of them) flawlessly and in just a few minutes.
A few more links to using running metrics: there are a number of GPX viewers that let you visualize runs and pull more information out, depending on your waypoint and fitness tracker. I like GPS Visualizer, an online viewer, since it has a number of output options and can pull elevation data (since my phone doesn't have an altimeter). GPSMaster also works well as an offline viewer.
Thursday, June 18, 2020
Broadcasting OBS through Zoom webinar field notes
I ran two different camera inputs: one from the front camera off an iPad Pro using NDI HX. It sent a wireless IPcam signal to my Macbook about 20 feet away. It had great quality video up to 4K, or the limits of your iPad camera, a good amount of HUD-enabled settings like exposure and focus lock, zooming and zero noticeable delay. It has an audio function as well, but we did not use it. Battery power was great, about a 10% drop per hour. This camera was set as the main, or 'A', camera as it had a locked-off shot containing all our stage talent.
The other camera was from a Canon 80D DSLR running Canon's new webcam software. This was hardwired to my Macbook using mini-USB. We had a long lens on this camera for close-ups and it ran as a backup 'B' camera. Unfortunately, it had a noticeable delay and would be visibly out of sync with our audio so I couldn't use it. I wasn't too troubled with this and didn't bother troubleshooting but in a test environment it ran lag-free and had great video quality. It could run for about 90 minutes straight on one battery charge.
Our audio was run by our new AV tech. She ran the stage mics to a mixer than routed the output through an M-Track 2x2 that outputted to USB. My Macbook recognized it as another mic input so I didn't have to adjust any settings, thought I did have iShowU installed and setup on my Macbook just in case.
Everything was routed into OBS except audio. Since we were broadcasting in Zoom webinar I just used the M-Track input as the mic input in Zoom. We were also using screen share so made sure to select the "share computer audio" option so our prerecorded videos could output sound to Zoom as well.
We used screen share instead of using OBS as a camera input in Zoom because I found the video quality to a be a bit better. I assume this is because I selected "optimize for video" when screen sharing which convinced Zoom to ease up on the compression compared to a camera input, even with "HD quality" and "original ratio" selected. Because I was screen sharing, I needed to send the OBS output using the "windowed projector" option. I could capture this projected window using the Zoom screen share.
This posed a few problems with Powerpoint. I usually drop all our slides and recorded video and audio into Powerpoint because it runs locally with no lag, allows for preview of previous and future slides, virtually unlimited transition and animation options, and very easy slide control. I setup the slideshow as "browsed by an individual" so it could present the show in a window. I then captured this window in OBS. Unfortunately, this window had to be the active window anytime an animation or video was playing, or else it would pause. That meant I couldn't click anything in OBS while a video was playing which was annoying, but worked with our presentation. I could imagine times this would be difficult in a live setting.
This kind of setup required a second monitor. I ran the Powerpoint and OBS preview windows, and the Zoom meeting controls on one monitor with OBS on the second for the mixing controls. Everything ran well, though since I had to "hack" OBS and run an unsigned Zoom it was a bit anxious at times waiting for something to crash -- which happened many times in test environments. For example, OBS would crash if I tried to resize the projection window too slowly!
We also experienced heavy compression and lag through Zoom. I'm still not 100% sure why since I was outputting 10,000kps bitrate at 1080 from OBS on a wired gigabit-upload ethernet. My test environment at home has significantly slower upload and image quality was much clearer. I'm thinking we'll have to switch to Youtube or Facebook for fall streaming if we can't fix this. I also did not configure audio output from OBS which we might need if we had background music or cued audio/video files from OBS. However, most of this can be embedded into Powerpoint. Recording in OBS was also slow and unreliable, though I didn't really check the settings. I suspect I had them on maximum which might have eaten up CPU cycles and hard drive space.
Saturday, June 13, 2020
Creating quick compilations in Premiere
Editing down that many videos can be a logistical and laborious nightmare but here are two tricks that make it a little bit easier in Premiere.
The first is editing to music by setting markers on cut points. Drop your soundtrack into your sequence and lock it by clicking the padlock:
Once you In/Outs are set, select your bin (or a selection of clips) and click Clip > Automate to Sequence:
Monday, May 18, 2020
Getting back to Twitter
In the past I've found Twitter quite a lot of work to maintain good relationships. It's a wonderful PLN but I find most of my conversations happen outside of Twitter. It works well as a status check, or getting myself out of the echo chamber that can happen when you fraternize only with like-minded people. Conversely, hanging out with people that are like me is pretty comforting.
Wednesday, May 6, 2020
Stages of eLearning
I am anticipating some degree of reopening for schools. Most likely it will be special education and a widening of criteria for school-based childcare. I also suspect a gradual re-entry of primary grades with severe restrictions. Examples from New Zealand and Europe and China indicate smaller class numbers, rotating attendance schedules, and a commitment to some form of virtual learning for students still at home.
Discussions about what might happen invariably get me thinking about this model from Jennifer Chang Wathall:
Thursday, April 30, 2020
Use OBS with Zoom on a Mac
The lack of switching control makes it difficult for us to control what the participants see, and all graphics or chyrons must be pre-installed on every participant's computer. We use Zoom's screen share to show videos or graphics and while it serves its purpose I wanted a bit more control over everything.
The first thing to do was to setup the OBS output as a virtual camera. Easy enough on Windows since there's a popular plugin for it, but the Mac plugin is a bit trickier. It's straightforward enough to clone it from Github and install it using Homebrew. You must install OBS first since the following script clones it and packages it with the plugin. Note that Zoom has now pushed out version 5 which may break the virtual camera detection. You may need to unsign Zoom to get it to recognize the virtualcam:
codesign --remove-signature /Applications/zoom.us.app/We need to have OBS recognize the audio input from Zoom and mix it with input from OBSHost's microphone so an audio mixer like iShowU would work. Thankfully there are quite a few streamers on Youtube that have walked through the process they use to be pro streamers. Apple has also a support document to combine multiple audio interfaces (called an Aggregate Device).
Once you have the cloned OBS running you can start the virtual camera in OBS and use it as a camera source in your meeting software. We use Zoom and Google Meet and both work well. However, only Zoom has a "mirror camera" setting so you'll need to horizontally flip the output if you're using Google Meet.
I didn't want to drop into Terminal everytime I wanted to run OBS so I wrote a shell script that launched it. Unfortunately, you can't add scripts to the dockbar in MacOS so you can use Applescript to package it as an app:
tell application "Terminal"
if not (exists window 1) then reopen
do script "cd /Users/USER/obs-studio/build/rundir/RelWithDebInfo/bin/" in window 1
do script "./obs" in window 1
end tell
Monday, April 20, 2020
The Week 3 reflection period
- School is open, no restrictions on physical gathering or interaction
- Few students or teachers away for prolonged absences due to self-isolation, quarantine, sickness, etc.
- Somewhat predictable dates of returns and departures
With unpredictable absences how do teachers keep on top of tracking and monitoring, and avoiding repeating missed instruction, and support returning students?
- School is open, some restrictions on physical gathering or interaction
- Increased absences
- Many students or teachers away for prolonged absences due to self-isolation, quarantine, sickness, etc.
- Unpredictable or variable returns and departures
Ensuring continuity of learning with larger numbers of active, but physically away, students
- School is closed, restrictions on physical gathering or interaction (ie no off-site campus alternative)
- No physical attendance
- 100% distance learning